Thursday, May 30, 2013

Party Time - One Reason NOT To Go RVing

   
Ready To Go!
    Everyone knows I love to escape in my RV. At a moment's notice I can be off on an adventure to recharge my figurative batteries and arrive home refreshed and ready to tackle life's daily grind. There are few reasons that would stop me from going. This weekend is one of them. It's my Dad's 90th birthday party.

My Mom (bless her heart) has put together a celebration that folks will remember. She's got catered food, several large tents, (not everyone could retreat into my tiny RV!) a band, and every living relative and friend she could locate. All in all about 100 people.

For the last few weeks she's been crazy-busy putting the whole thing together. And this week is the final preparation. Lots of things to finish up. Lots of opportunities for a failure. She's got it well in hand. I try to help out where I can, fixing stuff around the house and outside. Making sure she tries to relax a bit here and there. You see, Dad doesn't get around so well anymore, he really requires full time care. That's hard on anyone. How I wish she could take the RV and have a few days off. Nope. Not going to happen. If you think about it, she's pretty incredible. Yes, I know I'm biased, but...

Most of the long term RV projects I'm working on are on hold this weekend. I'm pretty sure sneaking down to the RV and working/tinkering would be bad. (Ghostbuster's BAD!)

Something Like This?
How is this connected to RV's? Well, Dad has been telling me stories of a vehicle he had MANY years ago. The best I can decipher from the story is some kind of station wagon with an add-on to the roof that would sleep a couple of people. There may have been some cooking amenities, maybe not. He tells of how horribly it handled and indeed ended up flipped over and destroyed. The debris spread down the road for a hundred yards. Luckily, no one was hurt. This was probably in the late 1940's.
Pretty Comfortable.


We've come a LONG way since then. I can tool down the road in complete comfort. The handling of most RVs beats cars only a few years old and when parked, you have every modern convenience feature you could ever want. Compare that to sleeping in a wooden box on top of a station wagon!

I'm reasonably sure I could live in mine full-time if I wanted to. (Or Could!) At times like this I let my mind wander to thoughts of a traveling retirement. Retirement? What's That?!


Anyway, I'll be "camped" at the party this weekend, likely having a great time. That's not to say I won't sneak a glance every now and again out the window to gaze wistfully at my escape-mobile. Maybe I'll turn on the A/C and use it as a refuge if things get too crazy.

Be Seeing You, Down The Road...

Rich "The Wanderman"
www.thewanderman.com


Wednesday, May 22, 2013

Tires And Tribulations

Bad Mojo!
    Some of you already know, that I recently found out my tires were 13 years old! This could have been bad, very bad. Another owner of an Aero Cruiser had a rear tire fail at speed and it did some horrific damage to both his fiberglass wheel well and much of his interior where the tire carcass tore through it. I figured it would be better if that DIDN'T happen to me! So, off on a quest for new tires. I figured I would gather some information on tires in general and then select a brand and type based upon what I discovered. Remember, do the research THEN buy. Saves time and money. I like that. You probably do too!

Original (To Me) Tires
My RV had Bridgestone LT235/85 R16 Load range "E" tires. These worked very well for me. I traveled all the way from the west coast to the east coast and then from NY to South Carolina on them. Handled well and were smooth on the road. A good combination. First thing to do? Make sure that the tires you are looking at will carry the weight of your RV. What? You don't know what your RV weighs with all your stuff, full tanks and You in it? Not good. Go find a truck weighing station or place that sells gravel or stone by weight and have it weighed! Better yet, see if you can find a place that can tell you the weight at each corner.

It's really good to know. Being overweight can have disastrous effects on handling and tire life. Better safe than dead. (Obvious, eh?)

First New Tire Mounted
Next decide if you are happy with your existing tires. How was the ride quality and handling? If it was acceptable and you can find the same tire brand and design in the right/same size for a reasonable price. Buy Them! When I went looking the Model of the tire was no longer available in the size I needed. I called Bridgestone to figure out what to do. Nice folks over there. They spent quite a bit of time explaining all the differences between a Passenger car tire, a Commercial Truck (Delivery and Long-Haul) tire and an RV tire. They are designed a bit differently. I found out that the tires I had were 3 generations old and there were updates that made the newer generations safer, longer lasting and better riding. Sounded good to me!

The Old Tires Looked Pretty Good
The Duravis R500 was the ticket. The Bridgestone engineer I spoke with let me know that tires should be safe for 10 years, BUT you should have them inspected by a tire professional each year after 7 and junk them after 10. I was long past that. The sad thing? The tires were in fantastic shape. Not really treadworn, no sidewall dry rot or cracking anywhere in the tread. Even inside they looked great. Still, for the under $200 for each tire shipped I figured it was cheap insurance against catastrophic failure. I know many RVs have tires that are MUCH more expensive, but what could happen may be a lot worse.

I'm not trying to scare anyone, heck I was running 13 year old tires with no problem at all. I probably could have gotten many more years out of them without a failure. Probably.

Spin Balancer
After you figure out which tires to buy, find a reputable shop that understands tires for heavier vehicles. I used a shop that could spin balance heavier tires up to 80MPH to get a good balance on them and prevent annoying (and possibly dangerous) vibrations at higher speeds. No, I don't cruise at 80MPH, but the balance will give me smooth travel at lowers speeds. Make sure the weights they put on (if any) are securely mounted to the rim. I don't like the stick-on ones...but lots of people swear by them. Balance all four (or six...or 8 etc.) tires.


When they are bolted back on your vehicle make sure you know what the torque specification is for your wheels. Usually you can find that in the manual. It will be in "foot pounds, ft/lbs" of Torque. Mine are 140 ft/lbs. each. This will make sure the wheels and tires stay attached and that you aren't damaging the rims when they are installed. After all of them are mounted make sure the tire pressures are set correctly. This will vary based upon the weight you are asking them to carry. Too little and the tire will overheat and possibly fail. Too much and the same thing could happen. Either way and they will wear improperly and put you back in the tire purchasing loop.

Your manual should let you know what the pressures should be. Sometimes they are different for the front and back. Mine are set at 65 PSI front and 70 PSI back. That matches the weights I have and the inflation chart the tire manufacturer published. Usually you can find the charts online at the manufacturers site.

Rear Suspension
Front Suspension
While the tires and wheels are off, I like to inspect the front and rear suspension and anything else I can see with the tires removed.  A couple of years ago I replaced/rebuilt both front and rear suspensions and it's nice to see they are doing well.


If you are unsure what to look for ask the tire shop guys. They are usually very helpful. Not always....but usually. By the way, if anyone is looking for some old 235/85 R16 Tires I have 4 of them. They LOOK pretty good!


Be Seeing You...Down The Road,

Rich "The Wanderman"
www.thewanderman.com


Wednesday, May 15, 2013

Let The Sun Shine In (Again) - Replacing A Shower Skylight - Part 2

    Last week we began looking at, what seemed to be, a simple bathroom/shower skylight replacement. Most of it wasn't that difficult, but went a bit awry when I found out the new skylight's dome would NOT fit around the top of the shower stall. It would have to be raised a bit to work. Not catastrophic, mind you, but a real P.I.T.A. anyway. Especially, since it happened half-way through the install. Two sides had to be raised about 1/4" to allow the skylight to sit as flat as possible on the roof.


We did that with various bits of scrap wood, cut to size. They would also act as the backing for the numerous screws used to hold everything together. It's important that the "lip" around the new skylight plexiglass (or Lexan in my case) doesn't get bent too far. It could crack under the vibration and heating/cooling cycles of an RV roof. Flatter is better. I also wanted to eliminate a low spot at the front left corner that would pool water after a big rain. I added a fraction more height to that side so water would drain off the roof properly.


After all the wood was added and triple-checked, next was filling in the gaps with an expanding foam product. This would have several effects.

1. It would lock the wood in place before the screws were in place.
2. It would seal any large gaps or cracks around the shower stall.
3. It would add insulation and support to the skin of the roof.
4. It would add to the "water-tightness" of the repair.

 All good things!

Using expanding foam can be a bit difficult. It's really easy to use too much and end up with gobs of it expanding out, and over everything you are working on. Trust me I know. It's also hard to clean up and sticks to EVERYTHING. Used sparingly, it's a great thing indeed.

After the foam fully expands and is dried all the way through, you can cut/pinch it to the level you need all the way around the opening. I tried to keep it as neat as possible, but it will always have a "lumpy" look. Don't worry it's all hidden anyway.


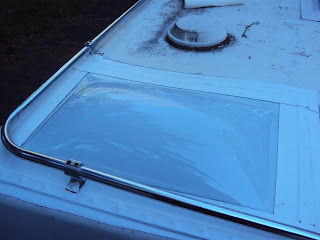
Bottom Of Skylight Before Test Fitting
The way a skylight is usually installed, there are a bunch of screws through the plexiglass and into the roof, with some kind of sealant below and above to seal the who thing together. When I removed the existing one, it was obvious that the screws had been tightened too much and created pressure points that caused cracks and deformations of the skylight itself. I decided to use 1" strips of thin aluminum stock (available at any home store) to spread the pressure across each side and create a "clamp" that would hold everything tight. Since I had wood backing the roof all the way around and the screws would be pressing into the aluminum, I would be able to create a nice even seal.
Cut the aluminum so it evenly surrounds the lip of the skylight with no gaps.

Aluminum Strips With Counter Sunk Screw Holes
First, I purchased a drill bit set that let me drill countersunk holes so the screws would sit flush with the aluminum. To put it all together, I used flat head stainless steel screws to prevent rust and each one was coated in sealant to further seal them and make sure we'd have very little contact between the aluminum and the stainless steel. (It is possible to have dissimilar metal corrosion over time) I spaced the screws evenly around the edges making sure each corner had its' own screw. I left most of the protective covering on the new skylight, just in case. I have been known to damage things in my haste to get things done. 

See The Slight Oozing Of The Sealant!
Once everything was test fit, I used a caulking gun and lots of the sealant to lay thick beads all the way around the fiberglass under the skylight. Gently placed the new skylight over the hole. To be honest I was in the shower stall holding and positioning it while a friend actually held it above the still wet sealant. Once placed, we added a light bead of sealant on top and placed the pre-drilled (and test fit!) aluminum strips all around the edges. Then the holes were filled with sealant and inserted one screw for each hole (DUH!). Gently tightening down each one until it was snug, but not tight. Working from the flattest corner we tightened one screw at at a time until all of them were snug. Watch carefully for sealant being pressed out from the edge. You should have that happen all the way around. 

Clean it up with a paper towel or rag (NOT DYED!!) spreading the excess around the edge to create an additional sealing surface.

Plastic Roller For Bonding Tape
After that dries, I used 4" Eternabond tape all the way around (4 Strips) to further seal the assembly and hide the nasty outside edges. Use a hard roller to press down each flat section of the tape so the "micro-bubbles" burst and mix to create the bonding adhesive. When done properly, you should be able to see the shapes underneath. (Think "Wet T-shirt" contest...Or don't, if it will get you into trouble!)
Make sure all the sides are air bubble free. It takes a fair amount of pressure and patience, but it's very important.


INSTALLED!
Once done, I had to re-install the roof rack sections and make sure the roof mounting holes for them were filled with sealant and the screws covered as well. Always pays to be careful.

Lastly, remove the protective coating on the new skylight and check inside and out, making sure the seal is visually good.

I let mine cure for 48 Hours before water testing. Actually, it rained, HARD, two days later so it was a bit nerve wracking. So far I can detect no leaks! Amazing, I know.


The "milk" color of the new skylight looks much better than the dingy, dirty old one. It's also got less cracks and chunks missing from it!

The lighting in the shower is much more natural and pleasing to the eye than it was before. Likely, when it was new it was pretty close to this, but time and the killer UV from the sun had taken its' toll on the old plastic.


This just goes to show you, "if I can do this, you can too!" No job is too big if you divide it into smaller stages and have a plan of action. It also helps to make sure you have all the supplies and tools needed. Close at hand. "Work Smarter, Not Harder!"


Be Seeing You, Down The Road...

Rich "The Wanderman"
www.thewanderman.com